BBC News jQuery Map
In a recent project, I had to design and build a form that would allow a user to choose certain areas in the UK that their services would cover. The form would break the UK into it's 12 regions/countries, then further break those down into, counties and areas, meaning the user could potentially have to click tens of check boxes.
After some discussion and research, we came across the BBC News Map that allows the user to select news from particular regions in the UK. Clicking the South West would show news from counties such as Bristol, Devon, Cornwall and so on. This we felt was a great solution for making a rather heavy form easy to navigate and quick to use, and with a few alterations, we could make it the perfect solution to our problem.
Read on to find out how to create an interactive jQuery map similar to the BBC News Map.
SPAN vs AREA
The BBC News Map cleverly breaks England into 10 square-boundary regions, allowing them to make each region out of several tags rather than one tag. The use of the tag means that each region can have more styles applied to it (such as background images and colours), making the development a little easier but, each region could only ever have square boundaries.
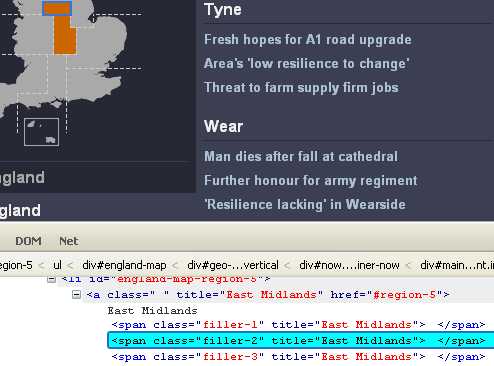
The map in this demo also covers Scotland, Wales and Northern Ireland - Scotland in particular is far from square and furthermore, I also want this technique of building an interactive map to be transferable to creating an interactive USA jQuery map where there are many more areas that require an accurate boundary for each state. So, in this demo, I have chosen to use the tag over the method because it allows us to draw a much more accurate boundary around each area.
Behind all the functionality, the BBC map consists of two images, a grey map of the UK and an orange one. When the user hovers over a , the background image of that changes to the orange map and the surrounding tags remain grey. The downside to the tag is that we can't apply styles to it, so instead, when we hover over an tag, we will change the background image, not of the but of the tag. This will create a little more work as it means we have to have an image of the map, as well as an image for every area highlighted, totaling 13 maps altogether.

Using the tag seems like a bad trade for the extra work we have to do but it will allow each area to be much more accurate and if you plan on using this demo to make a map of a bigger country, such as the USA, it would be impossible to create square boundaries around each state.
Creating the Maps
I used Adobe Fireworks to create the maps. As I decided to create 13 maps - rather than go down the route - I kept the overall map simple.
I took a map of the UK and Ireland from Google Images and then using the pen tool, drew a basic outline around the coast of the UK and Ireland to make my own map. I added the grid over the top, much like the BBC's Map. I then started filling each area to make the mouse over areas. The square grid meant I didn't have to spend too long doing little jagged lines between each region plus I felt it was quite stylish and in keeping with the simplicity of the website it was originally designed for.
I exported each map using the gif format, this meant each map was around 4.5kb - all 13 maps total 58kb which isn't bad! A Dial up modem user shouldn't even have to wait too long to download that.
Creating the HTML Map
To create the hover areas over each map, we'll need to use the tag, and as such, you'll require a HTML editor that has WYSIWYG capabilities (unless you want to make things really difficult!). This tutorial will cover the popular Adobe Dreamweaver.
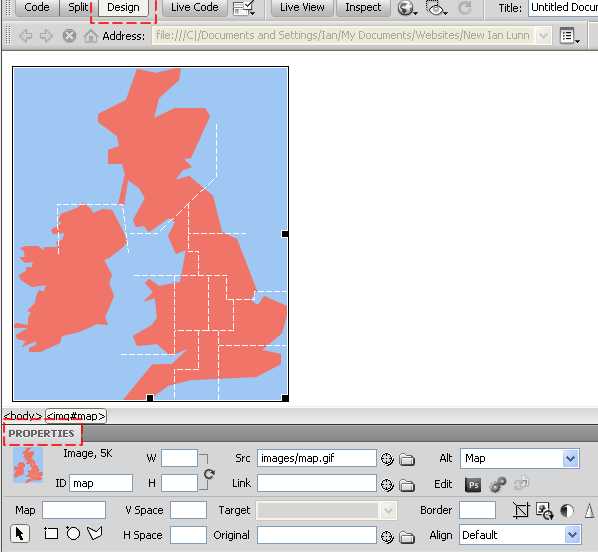
Begin by opening a new HTML document in Adobe Dreamweaver and insert the image of the map:
<img id="map" src="images/map.gif" alt="Map" />
Now, go into the 'Design' view of the document, click the image of the map, and open the properties panel.
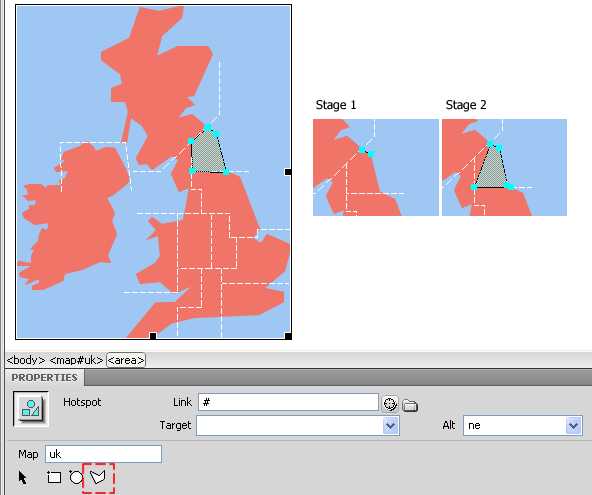
Using the Polygon Hotspot Tool, we can begin drawing the areas that make up the UK. If this is your first time with the Polygon Hotspot Tool, its very simple (and much like the pen tool from an Adobe Creative Suite application), simply click a point you want to begin from, then click the next point on the border; click each new point that the border takes a new direction until you've completed the area.
In the properties panel, give the map a name, this will link each or "Hotspot" to the image of the map.
To start drawing another Hotspot, you'll need to click the Pointer Hotspot Tool, click on the image of the map, then click the Polygon Hotspot Tool again. If at any point you are unhappy with the shape you've created, you can click the Pointer Hotspot Tool and drag any point of a Hotspot to change it's shape.
The HTML
Now the map is complete with Hotspots, we can move onto the HTML. I won't detail it all here as it's included in the download and the majority of it is self explanatory. The most important part to the HTML is giving classes to the tags that are going to require the functionality provided by jQuery.
Firstly, I've given each (the Hotspots you just created) a class. The North West gets the class of "nw", North East is "ne" and so on.
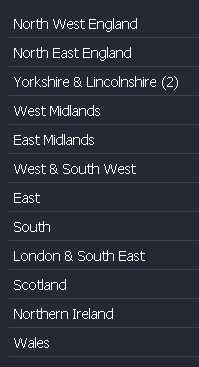
The region list will also be given classes using the same convention. The tags and items in the region list both have the same functionality so it's best we give them the same classes.
<ul id="regions">
<li class="nw">North West England <span class="nw-n"></span></li>
<li class="ne">North East England <span class="ne-n"></span></li>
<li class="yl">Yorkshire & Lincolnshire <span class="yl-n"></span></li>
<li class="wm">West Midlands <span class="wm-n"></span></li>
<li class="em">East Midlands <span class="em-n"></span></li>
<li class="sw">West & South West <span class="sw-n"></span></li>
<li class="e">East <span class="e-n"></span></li>
<li class="s">South <span class="s-n"></span></li>
<li class="se">London & South East <span class="se-n"></span></li>
<li class="scot">Scotland <span class="scot-n"></span></li>
<li class="ni">Northern Ireland <span class="ni-n"></span></li>
<li class="w">Wales <span class="w-n"></span></li>
</ul>
The region list will also contain a span for each item which will display the number of areas that have been selected in that region. This figure will update every time a new area has been selected.
Let's also take a look at the list of areas for each region and what HTML that involves:
<div id="nw" class="counties-container">
    <h2>North West</h2>

    <p class="select">
        <a class="selectall" title="Select All">Select All</a> |
        <a class="deselectall" title="Deselect All">Deselect All</a>
    </p>

    <fieldset class="nw-t">
        <input type="checkbox" /><label>Greater Manchester</label>
        <input type="checkbox" /><label>Lancashire</label>
        <input type="checkbox" /><label>Merseyside</label>
        <input type="checkbox" /><label>Cheshire</label>
        <input type="checkbox" /><label>Cumbria</label>
    </fieldset>
</div>
The overall containing div for each list of areas will be given an id, again using the convention mentioned above (North West = "nw", North East = "ne" etc). We'll hide/show these id's as the user selects each region.
To make things really easy for the user, each region can be double clicked which will tell the jQuery to select all areas in a region, so each <fieldset> will also be given a class so the jQuery can target a particular set of checkboxes.
The jQuery
The jQuery is the power behind the HTML. Simply, the jQuery has a few events that will take effect before the page loads (for the purpose of unobtrusive Javascript - more on that later), a hover over and double click handler, and two click handlers. Let's take a look at each in more detail.
Hover Events
$('area, #regions li').hover(function() {
    var area = ($(this).attr("class"));
    $('#map').attr("src","images/map-"+ area +"-mo.gif");
    $('.'+area).css("background-color","#3c3e52");
},

function() {
    var area = ($(this).attr("class"));
    $('#map').attr("src","images/map.gif");
    $('.'+area).css("background-color","#262835");
});
The hover handler simply changes the background image of the map and the background color of that area in the list. The second function will simply revert back to the default map and colour of that area when the user leaves the hover area. Simple!
Double Click Events
$('.nw, .ne, .yl, .wm, .em, .sw, .e, .s, .se, .scot, .ni, .w').dblclick(function () {
    var area = ($(this).attr("class"));
    $('.'+area+'-t input').each(
        function() {
            ischecked = this.checked;
        });

        if(ischecked == false){
            selectall(area);
            countchecks(area);
        }else{
            deselectall(area)
            countchecks(area);
        }
    });
});
Double clicking on a region either on the map or in the region list will start a loop in the code. This loop will establish if all check boxes are checked. If they are, then initiate the "deselectall" function (as the user is choosing to deselect), if they aren't, then initiate the "selectall" function. After either function, the "countchecks" function is initiated to update the number of areas that have been selected.
Click Events
$('area, #regions li').click(function() {
    var area = ($(this).attr("class"));
    hideall();
    $('#' + area).css("display","block");
});
There's two different click handlers. The fist one simply initiates the "hideall" function when a new region is clicked either in on the map or in the region list. After all area containers are hidden, the single area container requested is then shown.
$('input, .selectall, .deselectall').click(function() {
    var area = $(this).parents(".counties-container").attr("id");
    if(this.className == "selectall"){
        selectall(area);
    }

    if(this.className == "deselectall"){
        deselectall(area);
    }

    countchecks(area);
});
The seconder click handler is used for the "Select All"/"Deselect All" links. These were added just incase the user isn't aware of or comfortable with double clicking to select all areas. The handler will also initiate the "countchecks" function to update the number of areas that have been selected".
Unobtrusive JavaScript
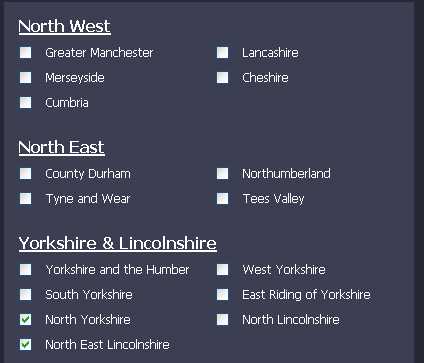
In any web application, it's important to consider a user that may not have JavaScript enabled. Both the jQuery and CSS have a few extra lines of code to make a users lack of JavaScript as painless as possible.
Firstly the CSS:
#st-c{display: none;}
.select{display: none;}
#regions{display: none;}
The CSS will hide anything that will only work with JavaScript enabled. So for example, we hide the
Should the user have JavaScript enabled, the jQuery will straight away change this CSS back whilst still in the DOM (before the page even displays on the users screen):
hideall();
$('#st-c').css("display","block");
$('.select').css("display", "block");
$('#regions').css("display", "block");
Firstly, it'll initiate the "hideall" function, hiding every
What More can be Done?
It was simple right? The interactive map acts as a really nice way to select multiple areas in the UK without even having to scroll throw a huge list. As a demo, there's many more things you can do with it! Why not try:
- Developing an interactive jQuery map for a country of your choosing? Let me know if you do, I'd love to link to it!
- Making the map count the number of areas checked onload. The jQuery would need to loop each area in the "countchecks" function before the document loads.
- Making the map dynamically fill in the areas previously checked by a user. If this were on a commercial website, the map would also need to be able to pull each area from a database and check the areas the user has previously checked onload, just in case the user wants to edit their chosen areas.
Ian Lunn is a Front-end Developer with 16 years commercial experience, author of CSS3 Foundations, and graduate of Internet Technology. He creates successful websites that are fast, easy to use, and built with best practices.